
CBSE Test Generator
Create Question Paper & Download as PDF
This question paper creator is a freemium product developed by myCBSEguide for CBSE teachers, parents and students. Now teachers, schools and institutes can generate and print the best quality question papers with their own name & logo. The whole process takes hardly a few minutes to print the customized test paper.
Using this online tool, teachers can create a variety of question papers from chapter tests, unit tests, class tests, and pre-board papers to annual exam question papers with solutions in minutes. Here are the key features of this online test generator:
CBSE Test Generator
- Generates question papers in minutes.
- Print solutions/answers in separate PDF files.
- Add your own name and logo on each page.
- Latest questions as per the CBSE syllabus.
- Customize marking scheme and question paper design
- Add general instructions to each question paper.
- No software or additional tools are required.
- Saves your time and money.
- Simple and easy-to-use interface.
- Designed as per the latest CBSE curriculum.
- Very useful for everyday practice tests and evaluations.
What is a Test Generator?
Test Generator is an online application used to create question papers and conduct online exams. It is a well-structured databank of questions and answers. The beauty of the test generator is that it can create question papers within a few seconds only with the user's name and logo.
CBSE Test Generator has more than 7,00,000 questions. You can use it to make all types of question papers from primary classes to entrance exams and competitive exams.
How do I create an online test paper?
Here is your guide to creating online tests for free. This tutorial will help you create a question paper online.
- Login to https://examin8.com
- Click the Start button to create a question paper
- Select your class and subjects
- Fill in other relevant details
- Select questions from our question bank
- Save the question paper and solution as a PDF
Here is the complete video tutorial for the same.
This video will guide you through the process of creating question papers, preparing blueprints and taking prints or saving & sharing the question papers as PDFs. Let's elaborate on them one by one.
Test Generator Dashboard
First of all, open https://examin8.com and click "Start Now" to access CBSE test generator Dashboard. On this dashboard, you will get the start button on the top as shown in the figure below:
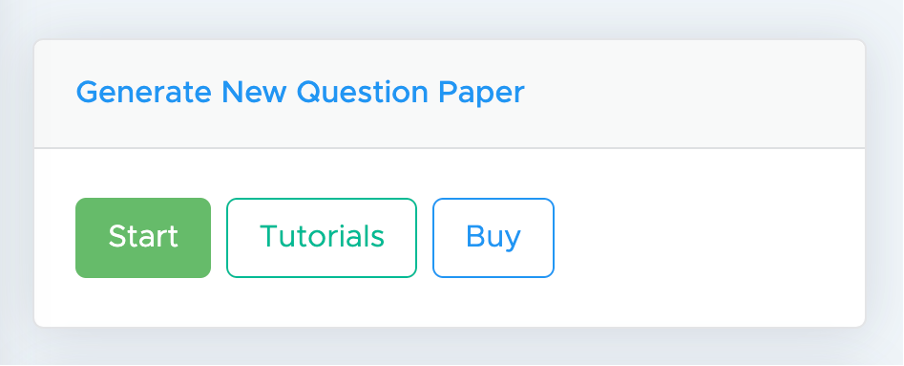
Simply click on "Start" to create your first free paper on CBSE Test Generator.
Enter Basic Details on CBSE Test Generator
Now, the first page will open and you need to enter some basic details like your class and subject, test paper name, general instructions etc to continue.
Select Class & Subject
Here, you will get a pop-up with three dropdowns. The first dropdown will ask you to select your module like CBSE, State Board, Entrance Exam, Competitive Exam etc.
You need to fill in all these dropdowns and then click OK to proceed.
Select Test Paper Type
The next option is to select the test paper type. Here, you will get multiple options as below.
You should select "Question Paper (PDF)" if you want to create an offline test such as a class test, unit test, term exam or annual exam question paper.
If you are planning to conduct an online test with objective questions only, you should choose the "
- Question Paper (PDF): This is a normal question paper & solution in PDF format. Best suitable for offline exams.
- Online Test (Objective Only): This is an online test with only objective questions such as MCQ, T/F, Fill-ups and One-word answers. Here result will be automatically generated.
- Online Test (Subjective + Objective): This is an online test including both subjective and objective questions. Here objective part will be evaluated automatically and the teacher will evaluate the subjective part. Students will upload question-wise images of the solutions.
- Worksheet (PDF): It is similar to a question paper without maximum marks, the time allowed and general instructions. Best suitable for creating worksheets and homework assignments.
Select Blueprint Mode
After selecting the question paper type, we will ask you to choose blueprint mode. If you don't want much customization, you must use "Express" mode only.
- Manual: You can add questions one by one from each chapter. Suitable if too much customization is required.
- Express: You can add questions altogether from each chapter. Suitable if less customization is required.
- Automated: Questions are added automatically based on a prefilled blueprint. Suitable if no customization is required.
- I will Add Questions: You will add your own questions or select questions from your own question bank.
If you wish to create full syllabus question papers for classes 9-12, we recommend "Automated" mode. There, we have already added blueprints of CBSE model question papers. It will help you create papers within 30 seconds only.
Select Template in Automated Mode
As soon as you select automated mode, you will find a dropdown just below that. You can select prefilled blueprints that will create your papers within a few seconds.
If you have saved any blueprint while creating papers in manual mode, you will find them all under automated mode.
You will also find the option to customize the blueprint there. It is very useful if you want to skip some chapters or edit marks.
Select PDF Header & Footer
Here, you will select your PDF header and footer. This header will be printed on the PDF files you generate for your question papers. You can also edit your PDF headers by clicking the edit header option there.
Test Paper Name and Time Allowed
The test paper name and time allowed are printed on the question paper. So, write it properly. The recommended text for this field is Class Test, Unit Test - 1, Half Yearly Examination 2022-23, Annual Examination 2023-24, Pre-Board Examination 2023-24 etc.
The time allowed is in minutes. So, write only numbers are minutes. For example, write "180" for 3 hours time duration. It will be automatically converted to "3 Hours" in the question paper.
Add Watermark in PDF
This feature will add a customized textual watermark diagonally on all pages of the question paper and solution PDF.
Write General Instructions
Although this field is optional and you can proceed to leave it blank yet we recommend you write some instructions for your students in this text area.
If you are creating a question paper in automated mode, you will get general instructions prefilled.
You will also get an option to edit general instructions in the next step too.
After that click the terms of use check box and proceed to "Save & Continue".
Add Blueprint in CBSE Test Generator
The interface of the blueprint dashboard depends upon the selection of the blueprint mode. So, as per your selection, there are three interfaces:
- Step 2 in Manual Mode
- Step 2 in Express Mode
- Step 2 in User Mode (own questions)
As discussed, the Automated Mode comes with pre-defined blueprints. So, if you select it, you will be redirected straightway to step 3 and step 2 will be skipped.
Let us discuss them all one by one here.
(1) Blueprint Dashboard - Manual Mode
A manual mode blueprint gives you the freedom to create sections and decide on question paper order as per your requirements.
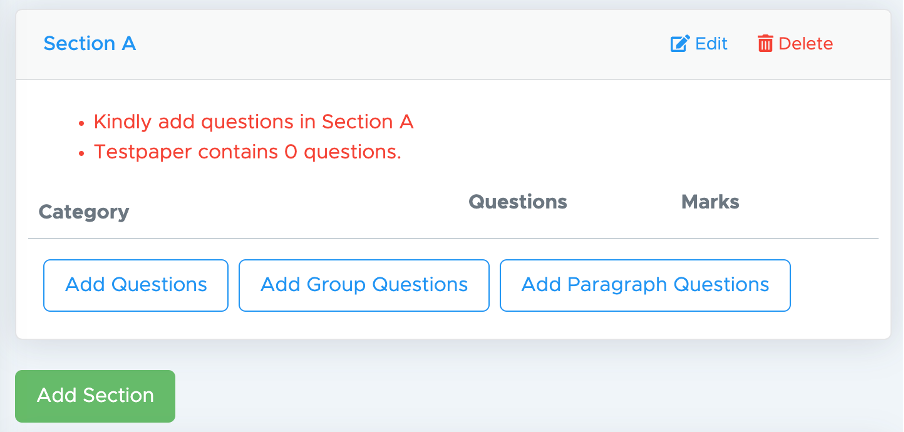
This screenshot describes how you will create your own blueprint on the CBSE test generator.
Edit Section Name
On the top right, one "Edit" link is placed. If you wish to edit the section name, just click edit and enter a new name for this section there. The default name is "Section A". You can edit it as per your requirement.
Delete Section
Just beside the section edit option, another link is given to delete the section. If you wish to delete a particular section, you can use this link.
If any section is left without questions, you will find one red colour notice "Kindly add questions in the section". You can either add questions to that section or delete that section if not required but you can't proceed to the next step with a section having no questions.
(A) Add Question
On this screen, you will find three buttons. The first button is to "Add Question". If you wish to add simple subjective or objective-type questions, you should use this button to add questions to this question paper blueprint.
We will display questions in the same order as you add them here. So, make sure you are adding questions in the correct order as per your requirement.
As soon as you click the "add question" button, one pop-up will appear on the screen.
(a) Select the Source
On the top of this screen, you can select the source of questions. You can keep it as "ALL" to get questions from all the sources.
But if you wish to get questions from NCERT, NCERT Exemplar, or both, you should select accordingly.
(b) Select Chapter
Now it's time to start creating your own blueprint. First of all, you will select a chapter from which you want to take questions.
(c) Select Topic
After selecting a chapter, you will get the option to select a topic within that chapter. If you want to take questions from all the topics together, just select "All topics". Otherwise, you can select a particular topic to take questions.
We recommend the section "All topics" to get a variety of questions to choose from.
(d) Select Question Type
As discussed, we have a variety of questions like MCQs, Fill ups, T/F, Subjective, statements, assertions, case studies etc. You can select the question type as per your requirement.
(e) Select Weightage
Weightage is the typology of questions based on marks. We have VSA, SA, LA, VLA type questions. You can choose them accordingly.
(f) Select Difficulty Level
We follow Bloom's Taxonomy to decide the difficulty level of a question. It is an optional field and you can level it blank. But if you wish to get only application or analyzing type questions or only remembering or understanding type questions, you can select the same from the dropdown.
(g) Available Questions
Just below these dropdowns, you will find available questions. It shows how many questions are available in our question bank as per the filters you have selected above.
(h) Required Questions
Now you will select a number of questions required. Because the questions come in question paper in the same order as selected here, you should select the number of questions wisely. For example, you select 5 questions, the question number 1 to 5 will be from this selection. So, if you don't want all questions from this chapter together, you should select required question 1 only and then follow the same process to add questions from the same chapter again after the desired interval.
(i) Suggestive Marks
Here, we are showing suggested marks as per the CBSE blueprint and marking scheme. But you can change them as per your requirement.
Add Internal Choice Question
As soon as you click OK on the popup above, you will see that one row has been added to the blueprint dashboard with all relevant details about your selection. You will also find three buttons just below that. These are
Edit - If you want to edit your selection, you can click on the link and edit the details.
Add Internal Choice - You will find this link only if you have selected the required questions as "1". We don't show this option if you have selected more than "1" question in any row. This feature will ad another question separated by "OR" within the same question number. Here, students will have the choice to attempt any one of them. You can click the "Add Internal Choice" link and add choices from the same chapter or any other chapter.
Delete - If you wish to delete this row, you can click the "Delete" link given there.
Now to add more questions to this blueprint, just click "Add Question" again and follow the steps above.
(B) Add Group Questions
Just beside add question button, we have placed the "Add Group Questions" button. Add group questions is very useful when you want to add multiple T/F or Fill-up types of questions as sub-parts of one main question like (a), (b), (c) .... (n).
It is also very useful when you want to give overall choice between 3 or more questions. For example, "Attempt any 5 out of 6 questions below".
On clicking the "Add Group Question" link, one pop-up will appear on the screen. On the top you will get a text field to enter Question Text like "Answer any four of the following questions in 30-40 words each:" We have given some suggestions there. You can choose the most relevant one and modify it.
Just below that, you can enter the question type and then the total marks for this group of questions.
(C) Add Paragraph Question
If you want to add case studies, unseen passages, extract questions any other type of questions where you get a few questions based on a paragraph or source text/picture, you must use the "Add paragraph Question" option.
Hence, the add paragraph question is to be used to get the following types of questions;
- Case Study Questions
- Unseen Passages
- Extract Questions
- Picture Questions
- Source/Text Questions
To add all such types of questions, simply click on the "Add Paragraph Question" link and follow the steps below.
- Select Chater and topic from the dropdown.
- Select the type of paragraph. If you want subjective questions in the passage, you must select the "sub+obj" option. Here, if you select "obj only" you will get only MCQs, ARQs, T/F and Fill ups.
- Available Paragraphs show how many such paragraphs we have.
- Required Paragraphs will always show "1" as you can select only 1 paragraph at a time. If you want more paragraph questions, you should follow the same steps again.
- Available Paragraph Questions show how many questions are there in each paragraph.
- Per question, marks came automatically as soon as you add the question required and marks on this screen.
- Required Paragraph Questions is an editable field where you can enter the exact number of questions required in this paragraph. The number of required questions can not be more than the available paragraph questions above.
- Paragraph Marks are the suggested marks. You can edit it as per your requirement.
- Grouping all sub-questions into ONE question will put all questions within the paragraph as sub-questions of the paragraph question. In most of the cases, CBSE has grouped paragraph questions as one main question. So, you may select it as per the CBSE blueprint.
- Add internal choice in questions option is displayed only if your required questions are fewer than the available questions in this passage. If you want to give an internal choice within these paragraph questions, you can use this option and decide for which question you need an internal choice.
How to Group Paragraph Questions into One and Add Internal Choice
Move Rows Up and Down in Blueprint Dashboard
You can see the Up and Down arrows within each row. If you want to move questions up and down, you can do using these arrows. Make sure that you can not move questions from one section to other. It works within the section only.
It is also useful if you forget to add any question row in a section. You can simply add it at the end of that section and then move up to the desired place.
(D) Add New Section
If you are done with adding questions in the first section and willing to add a new section, just click the "Add Section" button that is placed at the end of the question rows.
You can also edit the name of the section as mentioned above and then add questions with that section following the steps discussed above.
(E) Summary of the Blueprint
At the end of this blueprint dashboard, you will find a summary of the questions added by you. It will help you to verify your selection and proceed to the next step.
There may be some variation in total marks for example in some cases, you may get 79.97 in place of 80 marks. You can simply ignore it as it will be auto-corrected in the next step.
(F) Save as Blueprint
We know that creating a blueprint from scratch is a really time taking process and you would not like to do that same tedious task over and again.
That's why we have a "Save as Blueprint" option there. Once, you have added all the questions to the blueprint, just select the "save as blueprint" option, enter the blueprint name and save it.
Now, next time whenever you need to create a question paper for this subject in the same format, you should select Automated Mode on the home screen, you will find this blueprint name there. Just select it and it is done. You will be directed to step 3 and your question paper will be ready within 30 seconds in the same format but with a different set of questions.
You can use this blueprint any number of times in the future.
(G) Save Vs Save & Continue to Step 3
If you wish to save the changes made on this blueprint, you should click the "Save" button given at the end of that page. It will save the blueprint and you will be able to RESUME it from the "View Papers" page anytime and complete it.
If you don't click "save" and close the page in the middle, you will lose all data and you have to add questions to this blueprint from the beginning. So, we suggest that you should click the "SAVE" button after some time on this page so that your blueprint data is saved.
Save and Continue to Step 3 will save your blueprint and take you to the next step where you can review questions and create the final PDF/Quiz.
So, once your blueprint is completed, you need to click on Save and Continue to Step 3 to proceed.
If Save & Continue button is grayed out and you are not able to click it, please scroll the page up, you will find errors written in red color. Just fix these errors and then proceed. In most cases, it is because you may have added a blank row without questions or you have not selected the number of questions/marks in some rows.
Issues:
- Blank row without questions - If you find any such row, you can safely delete it using the delete button provided just below the row.
- Marks missing - In that case, click on the edit link and then add marks.
- More than permissible questions - if you have added more than permissible questions, you need to reduce the number of questions to the permissible limit and then proceed.
Video tutorial - Manual Mode
(2) Blueprint Dashboard - Express Mode
Express mode is very dynamic and compact. You will get everything on one screen and choose questions from different chapters and different topics altogether. It's a very time-saving and fast mode to create question papers.
Manual Mode Vs Express Mode
| Feature | Manual Mode | Express Mode |
| Creating Sections | Full freedom to create sections as per your requirement. You can decide the placement of each and every question. | You can create sections by either quesiton-ype or mark-wise only. Sometimes, it doesn't helpful anyway. Especially in language papers, none of these works. |
| Edit section name | Yes, you can edit the section name | Sections come automatically as Section A, Section B and s on. |
| Time & Efforts | It takes 15-30 minutes | it takes hardly 1-2 minutes |
| Saving Blueprint for future use | Yes, you can save the blueprint and use the same in Automated mode in the future. So, the first time it definitely takes time but next time, you can create papers within 30 seconds using the same blueprint in automated mode. | No, there is no option to save it as the blueprint |
(A) Select Chapters and Topics
Step 1 is to select the desired chapter and then the topics within the chapter. I you wish to get questions from the whole chapter together, you must select the "All Topics" option there. However, you can also choose questions from a particular topic within the chapter.
(B) Enter Required Questions
We will show you available questions for each question type on the same screen. You just need to enter how many questions you need from a specific question type. It hardly takes a few seconds.
(C) Summary of Selected Questions
At the end of that page, you will find a summary of the questions selected by you. If you wish to modify your selection, just move up the page and edit the required question or uncheck the topic to remove any particular topic from the selection.
(D) Sort By and Section By
In express mode, you have two options to sort questions in your question paper.
- Sort by Question Type - all MCQs will come together and all subjective will follow after that and so on.
- Sort by Marks - All 1 marker will come first and then 2 markers and so on.
In the same way, you have two options to create sections automatically
- Section by Question Type - If you select this option, the same type of questions will be placed in one section. If there are only subjective and MCQs, you will get two sections and if there are true-false, fillups and assertion-type questions too, you will get more sections accordingly.
- Section by Marks - Section A will have all 1 markers, Section B will have all 2 markers and so on.
At the end of this page, you will find the "Save & Continue" button. If the number of questions are under the permissible limit, you can click it and proceed to the next step else, you need to modify your selection and then proceed.
Video Tutorial - Express Mode
(3) Blueprint Dashboard - Automated Mode
Ideally, we don't show you any blueprint dashboard for automated mode. We simply redirect you to step 3 on the basis of the blueprint selected by you.
But if choose the "Customize this Blueprint" option on the first screen, we will take you to the manual mode with completely filled blueprint. If you wish to make any changes to the blueprint you can do so there by clicking on the "Edit" link and proceeding to step 3.
Customize this Blueprint
Customizing this Blueprint is a very useful feature. If you want to create a question paper in CBSE's full syllabus format but want to skip some chapters, you must use customize this blueprint feature.
So, you can create half-yearly exams and some other exams in the CBSE board exam pattern using customize this blueprint feature.
It is also useful if you want to skip a few chapters or edit some chapters.
Video Tutorial - Automated Mode
How to Customize Blueprint and Add Internal Choice
(4) Blueprint Dashboard - I will Add Questions
You should use this option only if you want to create a question paper with your own question and not use our question bank. We introduced this feature to help teachers who
- want to use our interface (software) only with their own questions
- want to create papers for subjects that are not available in our question bank
How to Upload Questions
There are two methods of adding your own questions to the test generator and then creating question papers.
- Adding Questions in Question Bank - In this method we first add all our questions into the question bank and then create a question paper in "I will add the question" mode. For this open the "Question Bank" link given on the left sidebar and then click the "Create Question" button. You will get a pop-up there. Just fill in all details and add questions. Once all questions are added, you can proceed to create questions.
You can also upload questions using a CSV file. One sample file is given there. Download it and add your own questions. Then upload the CSV file there. - Adding Questions while creating paper - The second method is to add questions while creating a question paper. In most cases, teachers follow this method only.
Adding Questions in "I will add" Mode
On the test generator blueprint dashboard, you will get the "Add Question" button. Click that button. Now fill in the following details on the pop-up that appeared.
- Chapter
- Topic
- Question type
- Weightage
- Difficulty Level
- Suggestive marks
(a) Questions from Question Bank
You will get two buttons there "Show My Questions" and "Add New Question". If you have already added questions in the question bank, click on Show My Questions button. You will get all questions placed under that combination. Just select them to add to the question paper.
(b) Adding Questions Directly
If you want to add questions directly, you can click on Add New Question button and enter your question with options and solutions there itself.
If you want to have more editing tools or want to upload images, click the blue color pencil & scale icon placed below the question text field.
All the questions added will also be saved to your question bank. So, next time if you want to create question papers with previously added questions, you need to click the "Show My Questions" button and select from there.
(c) Save Vs Save & Continue
At the end of that page, there are two buttons "Save" and "Save & Continue". We understand that adding questions on the spot is time taking process. That's why we have given you the option to "Save" the data you have already added. If you click save and close the page, the data is saved and you can resume it anytime from there.
On the other hand, the "Save & Continue" button will save the data and take you to the next step.
Video Tutorial - User Mode
Preview & Create Paper/Quiz
It is the third and last step in Test Generator. Here, we display suggested questions based on your selection. Each question comes with some common options to replace, edit, move etc. Let us discuss how you can use all of these options on the test generator preview page.
(a) Replace
We show the best combination of the questions from our question bank. But if you find that the question is not suitable, you can replace it. We give you up to 30 replacement choices. As soon as you click on the "Replace" button, we will show you 10 results. In the end, you will find the "More question" button with 10 more choices on the same screen. You will find the same button at the end to get the next 10 questions.
Now there will be 30 questions on your screen to choose from. But make sure that the replacement is selected wisely because once the question is replaced, the button disappears. So, you will not be able to replace the same question twice.
On top of this replacement pop-up page, you will see two radio buttons.
- All questions
- Unique questions
The "All questions" link shows all the questions including questions used in previous papers during the past 60 days whereas the "Unique questions" link will filter out repeating questions and will show you only unique questions.
(b) My Questions
You can use this option to add your own questions from the question bank. But for this, you must have added questions there under the same combination. Otherwise, it will show nothing.
(c) Edit Question
There are three use cases where you should definitely try this feature.
- If you find any minor mistake in the question text.
- If you want to make some modifications to the question text.
- If you want to add your own question.
For this, simply click on the "Edit Question" Button and make the necessary changes. You can also delete the question text completely and add your own question text. You can also copy text from the internet or a word file and paste it here.
If you wish to add images, click the blue color pencil & scale icon and then click [i] icon on the toolbar.
(d) Edit Marks
If you want to edit marks, just click on this button, add new marks and update.
(e) Move Up and Down
You can use this button to move questions up and down.
(f) Add Internal Choice
If you are using the express mode, you have no choice for adding internal choice there. In that case, you can use the "Add Internal Choice" button to do so. Even if you would like to add an internal choice in any question, you can use this button.
Make sure that the overall count of the questions in one question paper should not go beyond the permissible limits.
Also, the internal choice option is available only for offline papers i.e. Question Paper PDF and Worksheet PDF. You will not get this option for online tests.
(g) Edit Testpaper Details
At the end of this page, you will find the option to edit test paper details such as the test paper name, the time allowed and general instructions. If you forgot to add them in previous steps, you can add or edit them here too.
(h) Add Internal Choice within Sections
This feature is to be used if you want to provide an internal choice within the section. Let's see, there are 20 questions in section B and you want your students to attempt any 18 out of 20. In that case, you will use this option.
Just click "enable" then enter the number of questions to be attempted in a particular section and change overall marks accordingly.
If you want to add internal choice in only 1-2 sections, do the same and leave all other sections as it is.
At the end of this page, click Generate PDF or Create Quiz to finally generate your PDF/Quiz.

Test Generator
Create papers online. It's FREE.
![]()
CUET Mock Tests
75,000+ questions to practice only on myCBSEguide app